Recently I have completed one of, if not my biggest project so far, a DIY Z80 based CP/M capable computer. I say completed, but in reality it’s not quite there yet. There are still a few bugs to fix related to the horrible BIOS I wrote and quite a bit more stuff that I’d like to do, such as:
- Creating a few expansion cards for the expansion slot
- Setting up and programming the second serial port already available in hardware
- Improving the bootloader and adding a simple memory monitor feature to it
- Adding more escape codes to the serial terminal
- Creating a proper housing for the serial terminal
This is not an exhaustive list and I’m sure I’ll find more interesting features to add later down the line.
Now, in the following sections, I will proceed to explain some background information for those interested. If you only want to see the program itself being run, skip to the bottom of this page.
Hardware
I won’t explain how everything works hardware-wise in this article, but I should at least mention it here too.
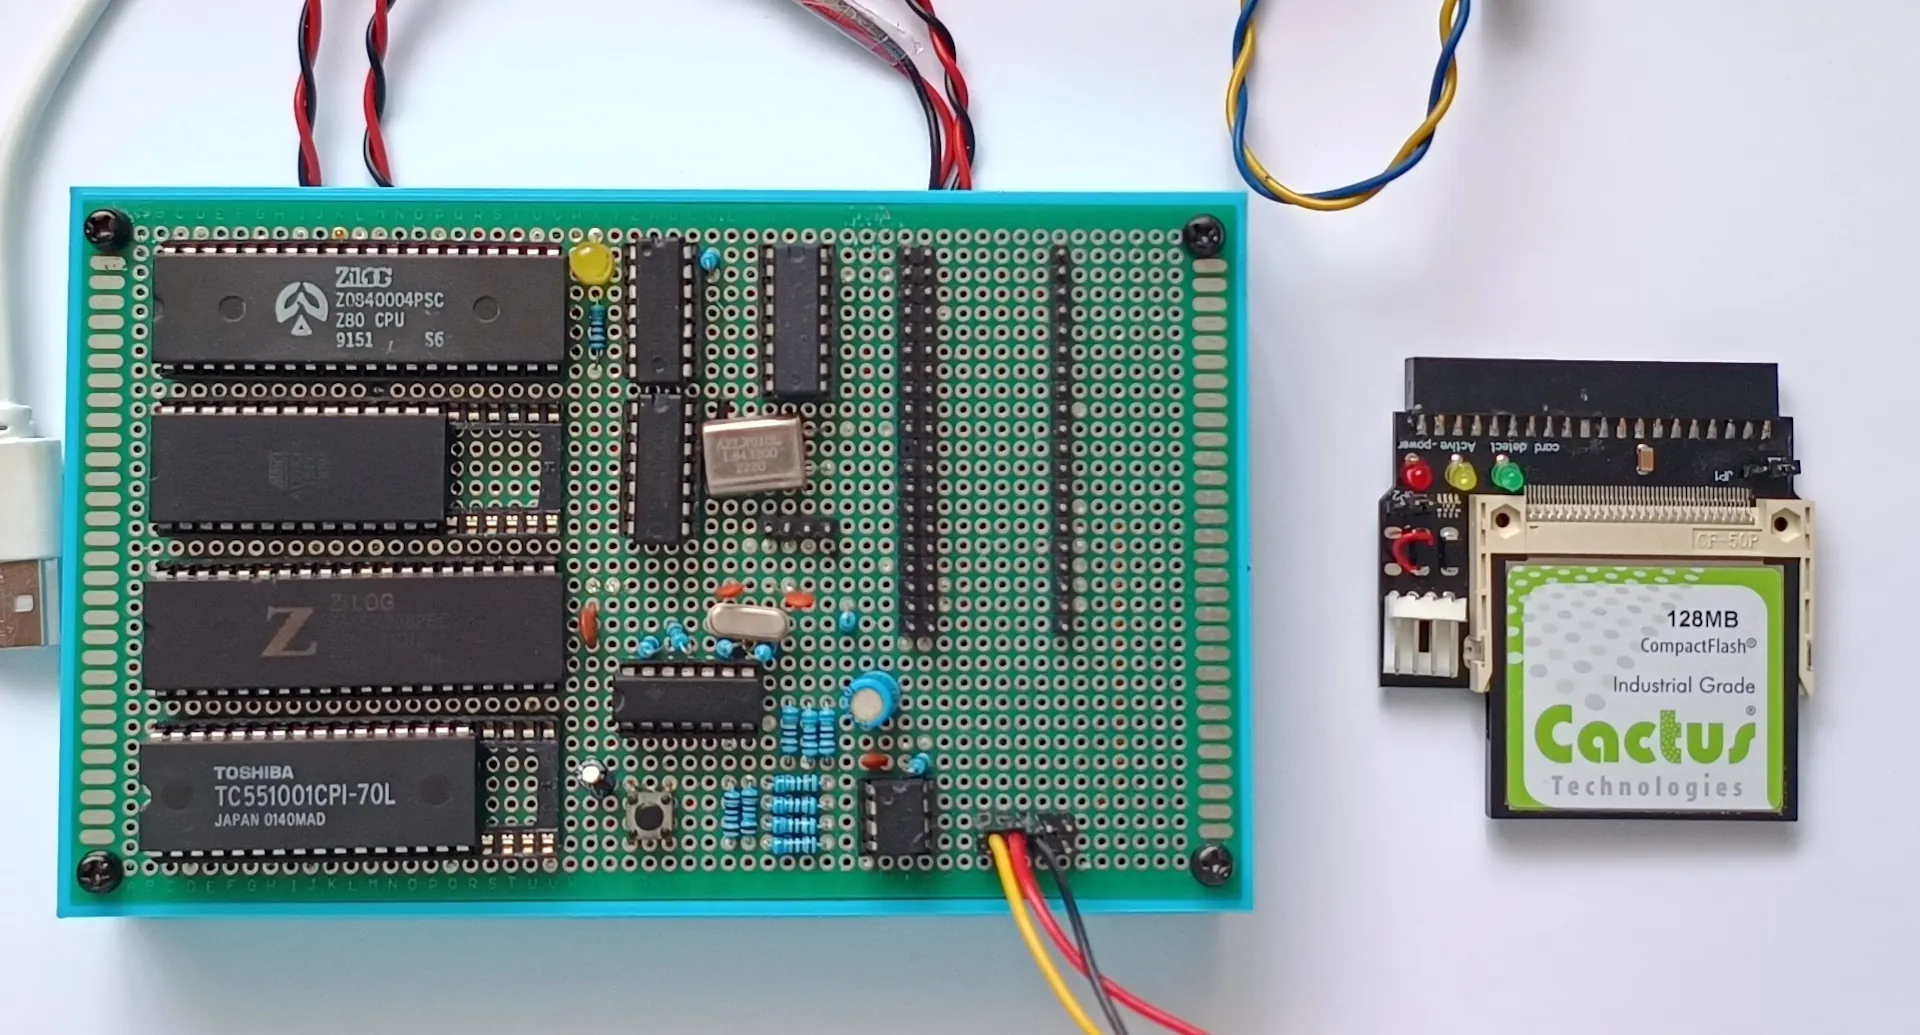
This is the main computer board, including all the memory, CPU, expansion port, the PATA interface for connecting to a compact flash card acting as a disk and finally, the serial interface. This serial interface is what allows the computer to communicate with the outside world.
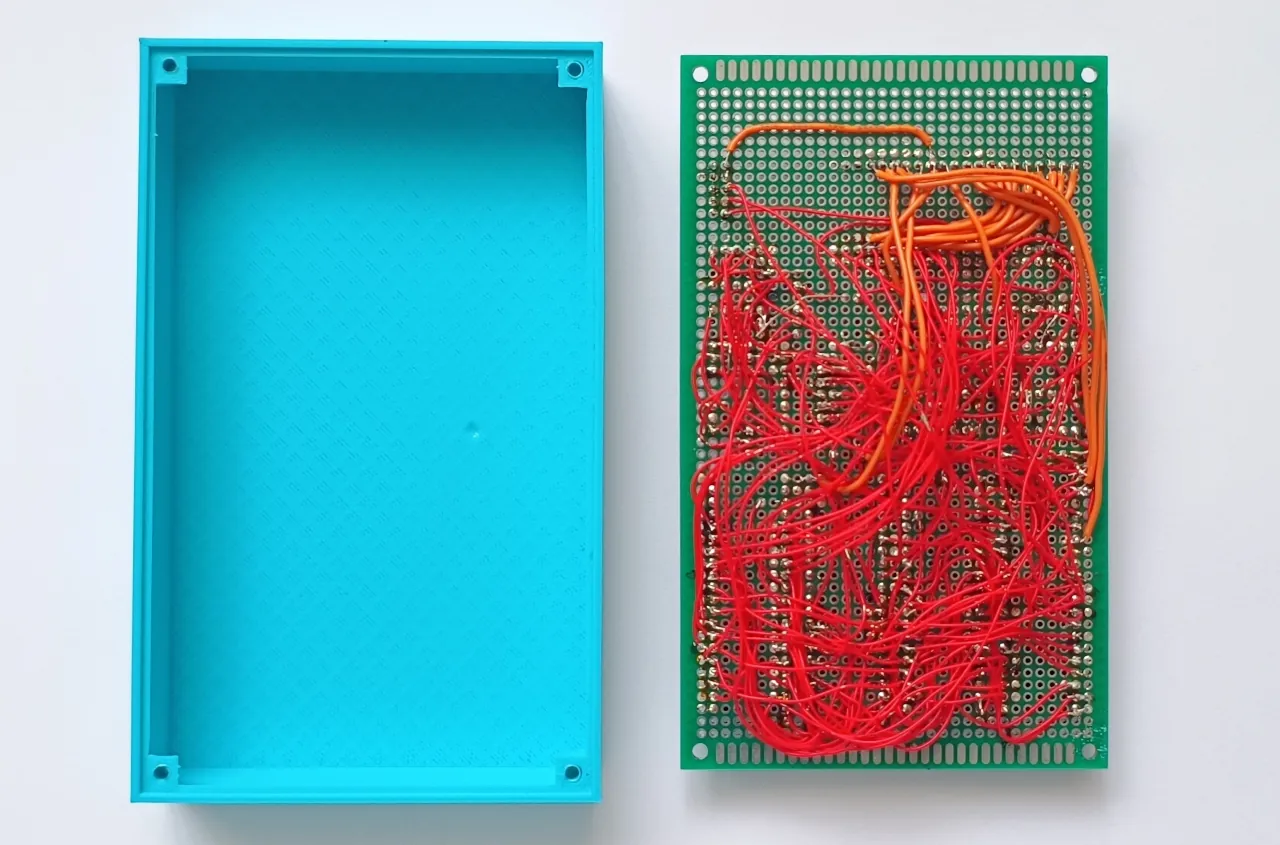
The housing is 3D printed and there are 4 screws holding the PCB in place. It was modelled in blender.
Finally, there’s the messy wiring underneath. I’m not proud of it at all and just like the majority of the things I do it wasn’t properly thought out. I ran out of red wire while soldering and I had to order new one, but I couldn’t find the original listing anymore so now I’m stuck with this orange-red wire mix. It works, and that’s what matters most I think.
Let’s move on to the serial terminal now. This is what connects the computer to a VGA monitor and a USB keyboard. At its heart is a Raspberry Pi Pico, as it’s perfectly suited for this job with its hardware USB stack and PIO, not to mention great community and library support. I used the tinyUSB and PicoVGA (https://github.com/Panda381/PicoVGA) libraries for programming the pico.
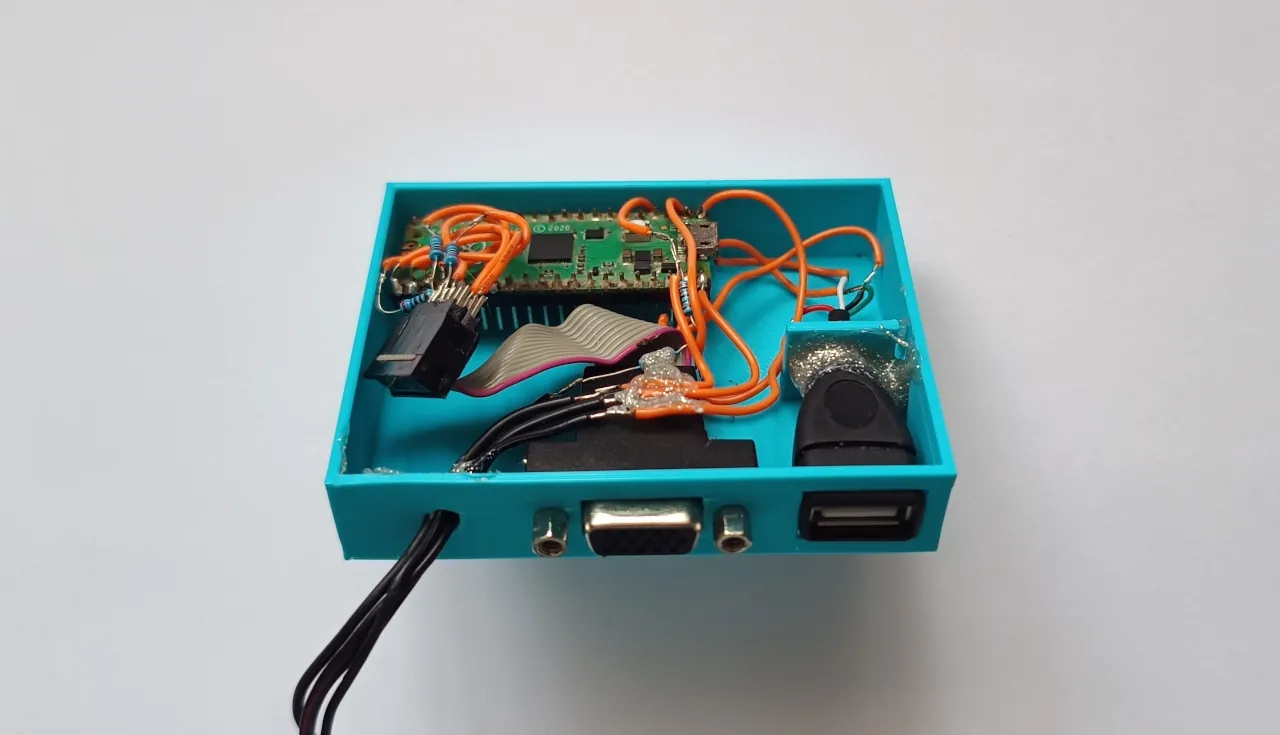
The housing is again 3D printed, but this time modelled in FreeCAD instead of blender. I always thought FreeCAD, and CAD in general was difficult but after giving it a go and learning what it could do, I can’t go back to blender now.
The CP/M operating system
To make programming easier and to have access to a bunch of programs written in the 70s and 80s, I decided to make my computer CP/M compatible. Control Program for Microcomputers, or CP/M is an operating system originally designed by Digital Research for the Intel 8080 microprocessor. As the Z80 I’m using is essentially a more capable 8080, CP/M can and was very often historically run on this microprocessor.
There’s only one problem however. CP/M expects RAM in the bottom area of memory (0-100h), which is a bit awkward for the Z80 as it starts running code from the bottom area in memory as well (address 0).
To get around this, I decided to use a switchable bootloader EEPROM that is active when the computer turns on and afterwards gets switched out when it has served its purpose, that being to load the OS from disk and do some hardware initialization.
This operating system however is very different from modern OSes. Firstly, it can’t multitask, so only one program can be run at a time. Secondly, there is no memory protection, meaning when a program wants to run, CP/M simply gives it the wheel and lets it do whatever it pleases. It can overwrite the operating system, mess with I/O ports directly, anything is possible.
Microsoft BASIC
For programming the game, I decided to use BASIC (Beginner’s All-purpose Symbolic Instruction Code), specifically the one developed at Microsoft in the late 70s and early 80s.
BASIC is an interpreted language, meaning the code is executed line by line with the help of an interpreter as the program is run. This makes interpreted languages slow, because the interpreter needs some computational power itself to run the program. With a compiled language, like C or C++, the code is first compiled into machine code which then runs directly on the CPU, meaning it’s a lot faster.
In this sense, you can think of BASIC as being similar to modern day Python. Slow, but easy to use.
And this is where CP/M shines, software compatibility. MS-BASIC was designed for CP/M, meaning any system running that OS with enough memory can run it. (including my own system!)
The code
Finally, let’s see some BASIC syntax. I’m definitely not an expert, so everything is very sloppily written, with hot fixes everywhere. There’s also some weirdness going on with drawing the board, as the serial terminal I made has some bugs itself that I tried to compensate for. You can also tell the program logic wasn’t thought ahead:
10 REM Tic Tac Toe game
20 REM Written 16/11/2025
21 T=1:X=0:Y=0
25 SX=0:SO=0
35 K$=""
36 SS=0
37 DIM B(3,3)
40 GOSUB 1000
41 GOSUB 4000
45 GOSUB 1000
50 K$=""
51 TNS=1
55 WIN=0
60 FOR I=0 TO 2
70 FOR J=0 TO 2
80 B(I,J)=I*3+J+10
90 NEXT J
91 NEXT I
110 K$=INKEY$
115 IF K$="Q" THEN END
120 IF K$<"1" OR K$>"9" THEN GOTO 110
130 SS=VAL(K$)
140 IF SS<4 THEN Y=4:X=SS*4
145 IF SS>3 AND SS<7 THEN Y=8:X=(SS-3)*4
150 IF SS>6 THEN Y=12:X=(SS-6)*4
151 GOSUB 3000
160 Y=Y/4-1:X=X/4-1
161 IF B(Y,X)=1 OR B(Y,X)=2 THEN GOSUB 6000:GOTO 110
162 TNS=TNS+1
170 IF T=1 THEN PRINT "X";:T=0:B(Y,X)=1 ELSE PRINT "O";:T=1:B(Y,X)=2
175 GOSUB 5000
180 IF NOT WIN=0 THEN GOTO 500 ELSE GOTO 110
500 X=1
510 Y=16
520 GOSUB 3000
525 IF WIN=2 THEN PRINT "DRAW!":GOTO 540
530 IF T=1 THEN PRINT "O WON!":SO=SO+1 ELSE PRINT "X WON!":SX=SX+1
535 PRINT "SCORE: ";STR$(SX);"-";:PRINT STR$(SO)
540 REDO$=""
550 INPUT "PLAY AGAIN (Y/N)";REDO$
560 IF REDO$="N" THEN END
570 GOTO 45
999 END
1000 REM Subroutine for printing the playing board
1001 GOSUB 2000
1005 PRINT " |   |   |   | "
1010 PRINT "---------------"
1015 PRINT " |   |   |   | "
1020 PRINT " |   |   |   | "
1025 PRINT " |   |   |   | "
1030 PRINT "---------------"
1035 PRINT " |   |   |   | "
1040 PRINT " |   |   |   | "
1045 PRINT " |   |   |   | "
1050 PRINT "---------------"
1055 PRINT " |   |   |   | "
1060 PRINT " |   |   |   | "
1065 PRINT " |   |   |   | "
1070 PRINT "---------------"
1075 PRINT " |   |   |   | "
1080 RETURN
2000 REM Subroutine for clearing the screen
2005 PRINT CHR$(27);"[J";CHR$(27);"[1;1H";
2010 RETURN
3000 REM Subroutine for setting cursor position
3005 PRINT CHR$(27);"[";STR$(X);";";STR$(Y);"H";
3010 RETURN
4000 REM Subroutine for printing tutorial
4005 FOR I=4 TO 6
4010 FOR J=4 TO 6
4020 Y=(I-3)*4
4030 X=(J-3)*4-1
4040 GOSUB 3000
4050 PRINT STR$((I-4)*3+(J-4)+1)
4060 NEXT J
4070 NEXT I
4080 PRINT "":PRINT "": PRINT ""
4090 PRINT "PRESS A KEY TO START"
4100 WHILE 1
4110 K$=INKEY$
4120 IF NOT K$="" THEN RETURN
4130 WEND
5000 REM Subroutine for finding win condition
5005 REM Check horizontal, vertical then diagonal
5010 FOR I=0 TO 2
5020 IF B(I,0)=B(I,1) AND B(I,0)=B(I,2) THEN WIN=1:RETURN
5030 NEXT I
5040 FOR I=0 TO 2
5050 IF B(0,I)=B(1,I) AND B(0,I)=B(2,I) THEN WIN=1:RETURN
5060 NEXT I
5070 IF B(0,0)=B(1,1) AND B(0,0)=B(2,2) THEN WIN=1:RETURN
5080 IF B(0,2)=B(1,1) AND B(0,2)=B(2,0) THEN WIN=1:RETURN
5090 IF TNS>9 THEN WIN=2:RETURN
5100 WIN=0:RETURN
6000 REM If player tries the same coordinate, handle here
6010 X=1:Y=16
6020 GOSUB 3000
6030 PRINT "CAN'T GO THERE";
6040 DS=0
6050 FOR I=0 TO 60
6060 DS=SIN(3)
6065 NEXT I
6070 PRINT CHR$(27);"[2K";
6080 RETURN
In my defense, using the MS-BASIC program editor wasn’t easy. I won’t go into detail, but to insert and delete lines you have to use the line numbers, you can’t edit it like in modern text editors.
Conclusion
With that, I will conclude this article. If you’re running your own CP/M based computer or an emulator, feel free to take this code and do whatever you want with it. Thanks for reading!
Addendum 2026-03-20
I updated the computer and made a short video on it!